Discover reports can be printed or exported regardless of whether or not it's been saved. Any dynamic interactions applied at the time of export (like drill down, dice, sorting, filtering, slicer interactions, etc) will be reflected in the exported content.
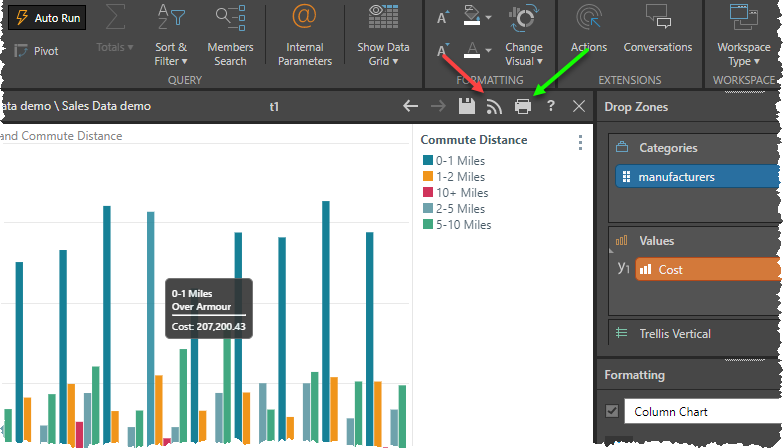
To print the report, simply click the print icon to open the Print & Export dialog (green arrow below).
- The subscription button is similar in effect to printing (red arrow). Except, users can automate the future printing of documents and distribution.

General Settings
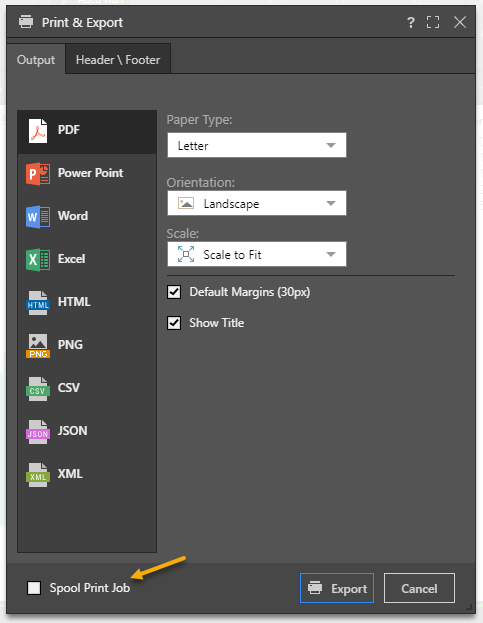
The Print and Export dialog in Discover shares most of the same features as all the print dialogs through the application.

Print Settings
Depending on the output type, the following settings are available:
Orientation
- Landscape: make the output orientation landscape.
- Portrait: make the output orientation portrait.
Sizing and Layout
- Paper Type: select the paper type/ size from the drop-down.
- Image Quality: set the image quality to low, medium, or high (PowerPoint and Word only).
- Scale to Fit: scale images to fit the output.
- No Scale: don't scale images.
- Default Margins: enable to set margins to default size (30 pixels). Disable to customize the margin size.
- Show Title: enable to show the title of the data discovery in the output.
Spooling
Click the Spool Print Job checkbox (yellow arrow above) to send the print job to the job spooler. This allows the engine to process the job in the background while you can continue using the application. When the print is complete, you can retrieve it from the spooler tool.
Key Settings for Specific Output types
Excel Files
- Freeze Worksheet Panes: select this options if you want to split the worksheet into planes by default.
- Spool Print Job: send to the job spooler.
Printing or Exports to Excel involve a number of adjustments to the export process. Click here for more details on this process.
PNG Images
- Image Quality: set the image quality to low, medium, or high.
- Scale to Fit: scale images to fit the output.
- No Scale: don't scale images.
- Spool Print Job: send to the job spooler.
CSV, JSON, and XML Files
- Show Unique Names: enable to show unique names (the member path). For example, [products].[Product Category].
- Show Caption as Column Header: use captions as column headers (instead of unique names). For example, 'Product Category' instead of [products].[Product Category].
- Spool Print Job: send to the job spooler.
Note: exporting to, and printing, Json, XML and CSV is not available in the Community edition.
Headers and Footers
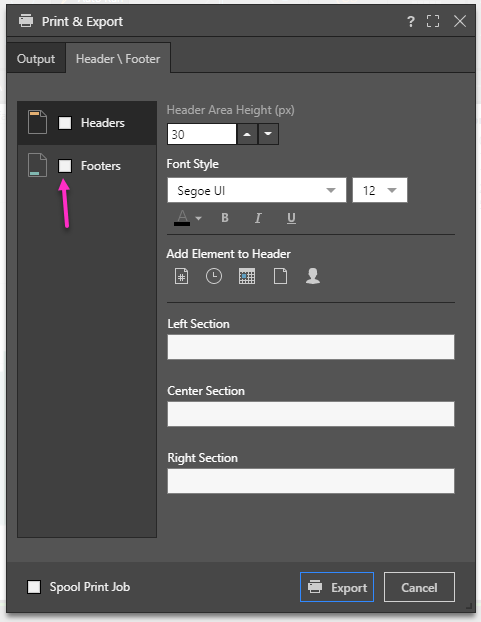
In Discover, users can add headers and footers to the rendered pages. To enable either item, check its box (pink arrow below).

From the Header/ Footer tab, configure any required headers and footers:
- Header/ Footer Area Height: set the area height (in pixels) of the header or footer.
- Font Style: set the font type, size, color, and emphasis.
- Add Element to Header: using the dynamic elements available, add page number, time, date, report name, and user name to the header or footer. By default, each dynamic element will be added to the 'Left Section' of the header or footer (see below for details). To add an element to the center or right section, click the field of the relevant section before selecting the required element.
- Left Section: add the dynamic element or free text to the left section of the header or footer.
- Center Section: add the dynamic element or free text to the center section of the header or footer.
- Right Section: add the dynamic element or free text to the right section of the header or footer.
Headers and footers that have been configured will only appear in the output if they are enabled from the General tab
Data Source Authentication
If the data source used in the discovery or presentation is based on Windows Authentication, then a separate panel will be presented to the user. The user may need to supply a set of credentials to successfully submit the scheduled task.
This often occurs when the authentication method for the data source is set to "End-user" Windows Authentication. Under this model, the user running the queries is used to connect (via Kerberos token) to the data source. However, when running a batch task (offline), the user's token is not available - as such a set of their credentials is required for connectivity by the Pyramid engine.
This may not be required if the website authentication is via Basic or Forms.
Schedules can also be configured for SAP BW sources if SAP Logon Tickets is selected as the authentication method in the Admin console. In this case, you'll be prompted to enter the relevant credentials.
Note:SAP Logon Tickets are available with an Enterprise license only.